Introduction
Machine polishing is one of the most effective ways to restore a car's paintwork — removing swirl marks, oxidation, and light scratches that washing alone won't remove. Done correctly, it transforms dull, defect-laden paint into a mirror-like finish that looks close to new.
But outcomes vary dramatically. The same machine in two different hands, with two different product combinations, can produce either a showroom result or a damaged clearcoat. Preparation, polisher type, pad selection, compound choice, and technique all interact — and a mistake in any one of them affects everything else.
This guide covers the full process: equipment, products, technique, and the mistakes that undo hours of careful work.
Key Takeaways:
- Machine polishing uses mechanical abrasion to smooth the clearcoat and restore gloss
- A dual-action (DA) polisher suits enthusiasts; rotary polishers require professional experience
- Wash, decontaminate, and dry the paint fully before the polisher makes contact
- Match compound and pad aggression to defect severity — always start least aggressive
- Apply protection (wax, sealant, or ceramic coating) immediately after polishing
How to Machine Polish a Car: Step-by-Step
Step 1: Wash and Decontaminate the Paint
Polishing over dirt or bonded contaminants turns your pad into sandpaper. A thorough pre-wash isn't optional — it's the foundation everything else builds on.
After a standard contact wash or snow foam, the paint still holds contaminants that can't be seen or felt. Auto Finesse's decontamination guidance supports a three-stage chemical decontamination sequence before any polishing or protection work:
- Iron fallout remover — dissolves embedded ferrous particles (brake dust, rail dust) that bond to the clearcoat surface; visible as a purple reaction on contaminated paint
- Tar and adhesive remover — breaks down sticky bitumen, glue residue, and bonded grime that iron remover doesn't address
- Clay bar with lubricant — physically pulls out remaining organic contaminants, leaving the surface genuinely smooth and ready for correction
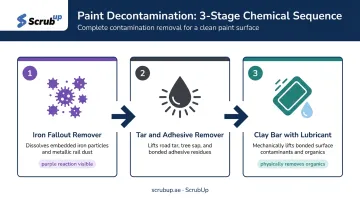
Each stage removes a different category of contamination. Skipping any one of them leaves material on the paint that will cause problems during polishing.
Step 2: Dry Down and Mask Off Sensitive Areas
The car must be completely dry before a polisher gets anywhere near it. Working on wet paint dilutes compounds and prevents them from breaking down properly. Menzerna's FAQ guidance confirms that a clean, dry, and cool surface is the correct baseline for machine polishing.
In Dubai's climate, drying in shade is a practical necessity. Direct sun in summer can cause compounds to haze on contact before you've started working them.
Once dry, mask off any area that shouldn't contact a spinning pad:
- Rubber seals and window surrounds
- Plastic trim and unpainted bumper sections
- Badges, emblems, and panel edges
- Any matte or satin painted surfaces
- Known respray panels with uncertain clearcoat thickness
Low-tack masking tape handles this. The risk isn't just compound residue in trim gaps — it's burning through thin edges or soft materials with a pad moving at working speed.
Step 3: Choose the Right Machine Polisher and Pad Combo
DA vs. Rotary — The Right Call for Most People
According to DetailingWiki, DA polishers combine orbital and rotational movement and are easier to learn than rotary tools. Rotary polishers spin on a single axis — they correct faster but concentrate heat and can leave holograms if technique is off. For anyone who isn't a trained professional detailer, a DA polisher is the correct choice.
One practical advantage of a DA: if you apply too much pressure, it stalls rather than burning through the clearcoat. A rotary won't stall. Pressure errors with a rotary cause immediate, irreversible damage.
The Pad-and-Compound System
Pads and compounds work as a graded system — the density of the foam and the abrasive level of the compound must match each other and the severity of the defects:
| Defect Severity | Pad Type | Compound Type |
|---|---|---|
| Severe (deep swirls, oxidation) | Cutting/compounding pad | Heavy cutting compound |
| Moderate (swirl marks, light scratches) | Polishing pad | Medium polish |
| Light (minor haze, finishing) | Finishing pad | Fine finishing polish |
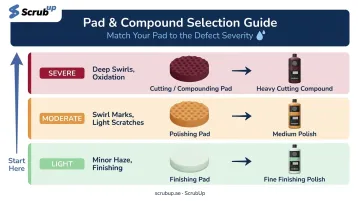
Always start with the least aggressive combination. Test on a small section before committing to the whole car. If moderate defects clear with a polishing pad and medium compound, there's no reason to introduce a cutting pad.
Step 4: Apply Compound and Work the Polish
Product Application
Prime a new pad before first use — Meguiar's DA Microfiber Correction System instructions specify spreading compound thinly and evenly across the entire pad surface before the first pass. This prevents uneven abrasion on the initial contact.
Follow your specific product's dosing instructions. A common benchmark is a small amount distributed across the pad — enough to cover the working area without excess that prevents the abrasives from breaking down fully.
Working the Section
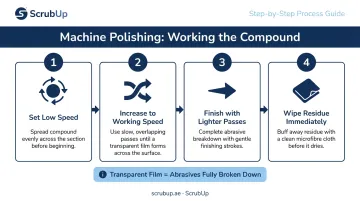
Meguiar's specifies working a roughly 2×2 ft section at a time. Koch-Chemie's Micro Cut M2.02 instructions call for working crosswise with medium pressure. The method is consistent across both:
- Set the machine to low speed and spread the compound across the section without slinging it
- Increase to working speed and use slow, overlapping passes — Koch-Chemie's guidance states to continue until a transparent film forms, which indicates the abrasives have fully broken down
- Finish with lighter passes to complete the breakdown
- Wipe residue immediately with a clean microfibre cloth
Don't rush this stage. Compound that hasn't fully broken down leaves residue and doesn't deliver full correction.
Step 5: Wipe Down, Inspect, and Apply Protection
Remove compound residue with a clean, folded microfibre cloth using light pressure. Then inspect under a strong directional light. A dedicated detailing lamp or Scangrip-style inspection light will reveal swirl marks, holograms, and missed areas that overhead lighting won't catch.
Fully corrected paint under direct inspection light shows no visible circular scratches or haze. If defects remain, work the section again before moving on.
Protection must follow correction immediately. Freshly polished clearcoat is exposed and starts accumulating damage as soon as you stop working. Options:
- Wax or paint sealant — easier to apply, good for general protection
- Ceramic coating — longer-lasting, particularly valuable in Dubai's high-UV, high-dust environment
If a ceramic coating is planned, use a panel wipe product (such as Gtechniq Panel Wipe) before application. Gtechniq's product documentation confirms it removes polish residue, wax, oil, and silicone to promote proper coating bonding. Any polish residue left on the surface will prevent the coating from adhering correctly.
What You Need Before Machine Polishing
Preparation determines whether machine polishing improves the paint or causes irreversible damage. The right equipment and correct working conditions are non-negotiable — skip either and you risk permanently damaging the clearcoat.
Equipment
- Dual-action polisher with confirmed orbital movement (RUPES LHR15ES operates at 15mm orbit; Mirka AROP-B 312NV at 12mm — both suitable for general correction)
- Foam pad set: cutting, polishing, and finishing grades
- Dedicated detailing or inspection light — overhead lighting doesn't reveal swirl marks reliably
- Paint depth gauge — DeFelsko confirms these are ideal for automotive detailing, assessing coating thickness before you start — essential on any vehicle with an unknown service history
- Low-tack masking tape
- 3-inch spot pad for tight curves and recessed areas where a 5-inch pad won't reach
Products
- Heavy cutting compound for severe correction
- Medium polish for general surface defects
- Fine finishing compound for final refinement
- Clay bar kit with lubricant
- Iron fallout remover
- Tar remover
- Panel wipe solution (required before ceramic coating application)
- Finishing protection: wax, sealant, or ceramic coating
Working Conditions
Work indoors or in deep shade. In Dubai, where UAE National Center of Meteorology data has recorded temperatures above 47°C, direct sun causes compounds to haze on contact. This prevents proper product breakdown and risks burning clearcoat. A covered car park, basement bay, or shaded garage is the correct environment.
Before starting, check:
- Paint depth readings on any vehicle with unknown history
- Avoid areas with unusually thick or thin readings (possible respray or clearcoat loss)
- Never polish over chipped, flaking, or cracked paint
Key Variables That Affect Machine Polishing Results
Most polishing failures trace back to one or more of these being wrong.
Polisher Type and Motion
DA polishers disperse heat through their orbital motion. If you apply too much pressure, the pad stalls, giving you immediate feedback that something is wrong. A rotary concentrates heat at the point of contact and won't stall under excess pressure. The consequence of over-pressuring a rotary is immediate clearcoat damage. Unless you have hands-on rotary experience, the DA is the only sensible choice.
Compound Aggressiveness and Pad Match
A heavy-cut compound on a finishing pad produces nothing useful. A fine polish on a compounding pad under-delivers correction. The abrasive level in the compound and the density of the pad need to work together as a system. Lake Country's pad documentation confirms that pad materials and aggression vary by tool, surface, and task: there is no universal setting.
Start with the lightest viable combination and escalate only if defects don't clear.
Speed and Pressure
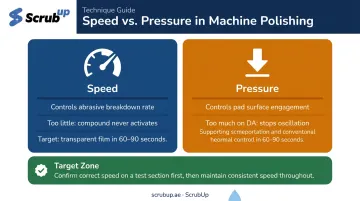
Speed and pressure do different jobs:
- Speed controls how quickly abrasives break down — too little and the compound never fully activates
- Pressure controls how aggressively the pad engages the surface — too much on a DA prevents proper oscillation
- Target range: find the speed where compound turns transparent within 60–90 seconds on a test section, then work consistently from there
Clearcoat Type and Paint System
According to Professional Carwashing & Detailing's 2025 analysis of German paint, German clearcoats are generally softer and more elastic than commonly assumed, making them more susceptible to swirls from improper technique rather than simply harder to cut. The assumption that European cars always need more aggressive combos doesn't hold up.
More critical is distinguishing single-stage paint from two-stage clearcoat systems. On single-stage paint, colour transfer to the pad during polishing is normal. On two-stage systems (clearcoat over basecoat), any colour on the pad means the clearcoat is gone and you're cutting into the basecoat. Stop immediately if this happens.
Common Mistakes When Machine Polishing a Car
Even careful polishers make these mistakes — and they're the ones that undo hours of prep work:
- Skipping or rushing decontamination — bonded particles under a moving pad create deeper scratches than the ones you're trying to remove
- Starting with too aggressive a combo — heavy cutting compounds remove more clearcoat and create more refinement work in subsequent stages; the correct approach is always lightest first, escalate only if needed
- Applying too much product — excess compound prevents abrasives from breaking down and leaves residue that's hard to remove; follow product-specific dosing instructions
- Working in direct sunlight or on hot paint — compounds haze and dry before breaking down properly; clearcoat is at elevated risk in high-heat conditions
- Skipping protection after polishing — freshly corrected clearcoat is fully exposed; without wax, sealant, or ceramic coating applied the same session, the paint will begin oxidising and collecting new defects within days
When Machine Polishing Isn't the Right Fit
Machine polishing involves equipment investment, skill development, and genuine risk if done incorrectly. These scenarios point toward a different approach.
Hand Polishing with an All-in-One Product
Works best on cars with minimal surface defects, no deep swirl patterns, and paint that just needs a single-stage enhancement. An all-in-one cleaner-polish-wax applied by hand or with a handheld applicator improves gloss and adds protection with zero machine risk.
The limitation is correction power. Hand polishing won't address moderate or heavy defects, oxidation, or established swirl mark patterns.
Professional Mobile Detailing
Works best when the car has significant paint defects but the owner lacks the equipment, experience, or time for safe multi-stage correction. A specialist with purpose-built DA and rotary setups can deliver correction results that are genuinely difficult to replicate at home.
Before any polishing begins — DIY or professional — the paint surface needs to be properly cleaned. For Dubai residents, ScrubUp's Pressure Wash (AED 75) uses high-pressure jets and pH-balanced foam to remove tar, brake dust, and road film from the surface. The service comes to your location, including basement bays, gated communities, and covered parking. Book via the ScrubUp app or WhatsApp.
The trade-off with professional correction is cost per session. For high-value vehicles, though, that cost is justified — it eliminates the risk of compound burn-through, pad contamination errors, and the irreversible clearcoat damage that rushed DIY work can cause.
Conclusion
Machine polishing delivers a level of paint correction that washing and hand polishing simply can't reach. That result depends entirely on preparation, matched products, and working the compound fully at controlled speed and pressure.
The majority of failures don't come from the machine. They come from skipped preparation, mismatched products, and rushed stages. Get those three stages right, and the machine does exactly what it's designed to do.
Frequently Asked Questions
Can machine polishing damage my car's paint?
Yes, if done incorrectly. A DA polisher used with appropriate pressure and the right compound combination is safe for most vehicles. Over-polishing or using a rotary without experience removes too much clearcoat. The key safeguard is always testing on a small area first and starting with the least aggressive combo that achieves the desired correction.
How much clearcoat does machine polishing remove?
Machine polishing removes a small amount of clearcoat per stage, varying by compound aggressiveness, pad type, speed, and pressure. DeFelsko's detailing data puts typical clearcoat at 35–50 microns; PPG's OEM data cites total film build at 90–120 microns. Correct technique doesn't meaningfully reduce paint life, but measuring with a paint depth gauge before you start is the responsible approach.
How often should I machine polish my car?
Machine polishing is a correction procedure that removes finite clearcoat — not a routine maintenance task. Once or twice a year is appropriate for most vehicles, timed before applying fresh protection. In Dubai, where UV exposure, heat, and dust (IQAir recorded a 2019 annual PM2.5 average of 40.9 µg/m³) accelerate paint degradation, inspecting condition and refreshing protection beats following a fixed calendar.
What is the difference between machine polishing and waxing?
Polishing is corrective: it removes surface defects from the clearcoat through abrasion. Wax is a protective layer applied afterward, shielding the smooth surface from UV, water, and contamination. Polishing should always come before waxing, not replace it. Applying wax over defect-filled paint doesn't correct anything; it temporarily masks it.
Do I need to apply a ceramic coating after machine polishing?
Applying protection after polishing is essential — exposed clearcoat degrades quickly without it. Wax, paint sealant, or ceramic coating all work. A ceramic coating offers the longest-lasting protection, making it a strong choice in Dubai's high-UV, high-dust environment where unprotected clearcoat deteriorates fast between wash cycles.
Can machine polishing remove deep scratches?
Machine polishing removes defects within the clearcoat layer only. If a scratch has cut through to the colour basecoat or primer — visible as a white or coloured line that doesn't disappear when wet — polishing cannot erase it. It can reduce visibility by improving the surrounding paint's gloss and softening the scratch edges, but full removal requires touch-up paint or professional respray.