Natural conditioning can slow that degradation, but results vary widely depending on which ingredients you use, what leather type you're working with, and how you apply it. Get those variables wrong and you can stain, streak, or seal in damage rather than prevent it.
This guide covers exactly what you need — and what to avoid.
Key Takeaways
- Natural conditioning works best on aniline and semi-aniline leather; pigmented leather absorbs oil differently
- Use linseed or flaxseed oil — avoid olive oil, which oxidises quickly in heat
- Clean seats thoroughly before conditioning; dirty leather traps grime and scratches during buffing
- Dubai's climate demands more frequent conditioning than the standard 3-month cycle
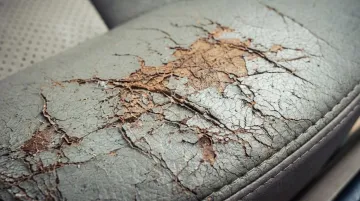
- Deep cracks, heavy staining, or a lost top coat need professional attention, not conditioning
What You Need to Condition Leather Car Seats Naturally
The wrong ingredient can strip oils, leave greasy residue, or damage a protective coating before conditioning even begins. Knowing what to gather — and what to avoid — saves your seats from preventable harm.
Natural Ingredients and Conditioning Agents
The most commonly used natural options fall into two categories:
- Linseed or flaxseed oil — penetrates leather fibres in uncoated and lightly coated leathers; the most appropriate natural oil for car seats
- Beeswax-based formulas — sit on the surface and create a protective barrier rather than penetrating; useful for coated leather
Natural ingredients to avoid entirely:
- Olive oil — heat accelerates oxidation; conservation research confirms oils and dressings can darken leather, attract dirt, and create fatty-acid deposits that complicate repairs
- Coconut oil in large quantities — can leave surface residue on coated leathers since it cannot penetrate the polymer layer
- Lemon juice or acidic DIY cleaners — lack verified safety data on finished automotive leather coatings
Supporting Tools and Materials
Gather these before starting:
- Two to three clean microfiber cloths (one for application, one for buffing, one spare)
- Soft-bristled upholstery brush or vacuum with a brush attachment
- Small mixing bowl
- Distilled water for the cleaning step — tap water carries dissolved minerals that can leave spots on leather surfaces
Leather Type Identification
Identify your leather type before choosing any conditioner — the right product for one surface can sit uselessly on another.
| Leather Type | Characteristics | Conditioning Response |
|---|---|---|
| Aniline | No pigmented coating; softest and most absorbent | Absorbs oil-based conditioners directly; also highest staining risk |
| Semi-aniline | Light surface coating; moderately absorbent | Partial absorption; test carefully before full application |
| Pigmented/coated | Polymer top coat; most common in modern cars | Oil sits on surface rather than penetrating; surface barrier protection still useful |
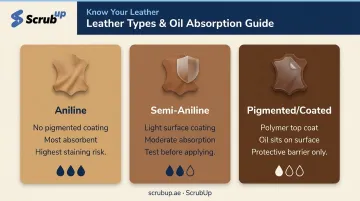
Quick test: Place a small drop of water on an inconspicuous area. If it absorbs, the leather is uncoated or lightly coated. If it beads, you're working with a fully coated surface.
Spot Testing
Once you've identified your leather type, confirm your chosen conditioner is safe before committing to the full seat. Apply a small amount to a hidden area — under the seat or the back of a cushion — leave it for 15–20 minutes, then check for:
- Darkening that doesn't fade
- Stickiness or tackiness
- Surface discolouration or sheen change
If any of these appear, stop and reassess your choice of conditioner.
How to Condition Leather Car Seats Naturally: Step-by-Step
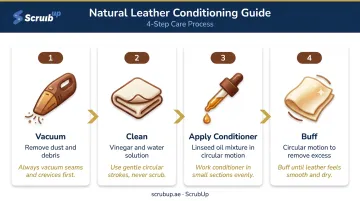
Step 1: Vacuum and Remove Surface Debris
In Dubai's dusty environment, fine sand particles left on a seat act as abrasives the moment a cloth touches them. Micro-scratches from conditioning over grit are one of the most common sources of seat damage.
Use a vacuum with a soft brush attachment along all seams, folds, and crevices. Slide the seat forward and back to reach hidden areas beneath and behind the cushion.
Don't skip this step even when the seat looks clean — fine dust invisible to the eye is still abrasive enough to scratch.
Step 2: Clean the Leather Surface
Conditioning over uncleaned leather seals in body oils, sweat residue, and surface grime. For a natural pre-clean:
- Mix white vinegar and distilled water at a 1:1 ratio
- Apply to a microfiber cloth — never spray directly onto the leather
- Wipe in small sections using gentle circular motions
- Follow immediately with a dry microfiber cloth to remove all moisture
Leaving moisture on leather in warm conditions encourages mildew growth. Work one section at a time and dry as you go.
Important: If the seat has visible stains or heavy soiling, address those separately before conditioning. Conditioning over stains doesn't remove them — it can make them harder to treat later.
Step 3: Prepare and Apply the Natural Conditioner
Mix your conditioner: 1 part white vinegar to 2 parts linseed or flaxseed oil. The vinegar provides mild cleaning and helps the oil penetrate; the oil delivers the conditioning.
Apply using this method:
- Load a clean microfiber applicator cloth lightly — squeeze out any excess before you start
- Work in a crosshatch or circular motion, covering small sections at a time
- Use light pressure — do not rub aggressively
- Give extra passes to high-wear areas: seat bolsters, the centre of the cushion, and the driver's seat specifically
With oil-based natural conditioners, less is more. A thin, even coat penetrates better than a heavy one — and won't leave residue behind.
Note on coated leather: On pigmented/coated seats, the conditioner will primarily sit on the surface rather than absorb. It still creates a protective layer, but don't expect deep penetration — and don't compensate by applying more product.
Step 4: Allow to Absorb, Then Buff Off Excess
Leave the conditioner to dwell for 10–20 minutes. Don't sit on or use the seats during this time — pressure will displace the product before it absorbs.
After dwell time, buff off all excess using a clean, dry microfiber cloth with light circular motions. Leftover natural oil on the surface will:
- Attract dust and sand
- Leave a greasy feel that transfers to clothing
- Potentially darken the leather if left unchecked
Once buffed, well-conditioned leather looks slightly richer in colour, feels soft and supple, and carries a natural matte or subtle sheen. If the seat looks shiny or feels tacky, buff again — there's still excess product on the surface.
Key Variables That Affect Natural Conditioning Results
Many people try natural conditioning, get poor results, and conclude the method doesn't work. Usually, the method was applied incorrectly. These are the variables that matter most.
Leather Type and Coating
Aniline leather absorbs oils directly into the hide. Coated leather has a polymer layer that prevents deep absorption. The same conditioner applied to both will behave completely differently.
On fully coated leather, oil-heavy conditioners leave residue on the surface because there's nowhere for them to go. For these seats, treat the conditioner as a surface barrier, not a deep treatment.
Oil Quantity and Application Pressure
Over-applying linseed or flaxseed oil doesn't improve results. Excess oil:
- Attracts dust and sand particles
- Can darken leather unevenly
- Increases oxidation risk in high heat
- Leaves a tacky surface that feels unpleasant
Thin and even beats thick and heavy, every time.
Climate and Temperature
Dubai's cabin temperatures can reach 68–76°C. At those temperatures, natural oils on leather surfaces oxidise and deplete faster than in cooler climates. This means conditioning results won't last as long — not because natural methods fail, but because the thermal stress is genuinely higher.
More frequent inspection and reapplication makes sense in this climate. Condition in a shaded, cooler spot: applying oil-based conditioner to hot leather causes the oil to evaporate before it absorbs.
Dwell Time and Buffing Technique
Insufficient dwell time leaves oil sitting on the surface, and aggressive buffing then spreads it unevenly — causing blotchy results.
The 10–20 minute dwell window followed by gentle circular buffing is the practical sweet spot. Even buffing also matters for UV protection — it ensures the conditioning layer has no weak spots where sun exposure can dry out unprotected areas of hide.
When Should You Condition Leather Car Seats Naturally?
Natural conditioning isn't the right approach in every situation.
Natural conditioning makes sense when:
- Leather looks mildly dull or slightly dry but has no cracks
- You're doing preventive maintenance on a lightly used vehicle
- The seats are aniline or semi-aniline leather
- You prefer chemical-free, eco-conscious care
Natural conditioning alone is not enough when:
- Leather has deep cracks — cracked leather needs repair before conditioning
- Seats have heavy soiling or set-in stains — conditioning doesn't replace deep cleaning
- The protective top coat has worn through — this requires specialist restoration
- You don't have time for the full clean-condition-buff process
For Dubai car owners who need more than routine maintenance — or simply don't have time for the full DIY process — ScrubUp's Steam Wash service (AED 105) delivers professional interior cleaning directly to your parking spot. The service uses controlled 170°C steam to sanitise seats, dissolve surface grime, and reach deep into seams without harsh chemicals. Book in minutes via WhatsApp or the ScrubUp app, and a trained technician comes to you.
Common Mistakes When Conditioning Leather Naturally
Skipping the cleaning step is the most common error. Applying conditioner to dirty leather traps grime beneath the conditioning layer, causes micro-scratches during buffing, and seals in stains that become harder to remove later.
Avoid olive oil entirely. Heat accelerates oxidation — and Dubai's cabin temperatures create exactly those conditions. Oils like olive oil can darken leather, attract dirt, and leave fatty-acid deposits over time. On lighter-colored leather, that discoloration risk is especially hard to reverse.
Over-conditioning doesn't deliver better results — it creates new problems. Excess oil builds up on the surface, makes the leather greasy, and attracts more dust. For coated leather, repeated over-application dulls the finish over time.
Never condition hot leather or work in direct sun. Heat causes oil to evaporate before it absorbs. Always cool the cabin down first and work in a shaded spot — during Dubai's summer months, interior surfaces stay dangerously hot long after the doors open.
Frequently Asked Questions
Can I use coconut oil to condition leather car seats naturally?
Coconut oil can be used sparingly on aniline leather but is not ideal for coated automotive leather. On coated seats it stays on the surface, creates residue, and carries oxidation risk in high heat. Linseed or flaxseed oil are better alternatives.
How often should I condition leather car seats in a hot climate like Dubai?
In Dubai, condition every 4–6 weeks during summer months (May–September) and every 6–8 weeks the rest of the year. Extreme cabin heat and UV exposure deplete conditioning far faster than the 3-month cycle that works in cooler climates.
Is olive oil safe to use as a natural leather conditioner?
No. Olive oil is not recommended for car leather. Heat accelerates its oxidation, which can produce odours and cause staining, especially on light-coloured seats where yellowing is visible. Despite being commonly suggested, it's one of the riskiest choices in Dubai's heat.
What is the best homemade natural leather conditioner recipe?
Mix 1 part white vinegar with 2 parts linseed or flaxseed oil. This combines light cleaning action with conditioning and is suitable for most leather types when applied in thin, even coats. Always spot test first.
Can natural conditioners protect leather car seats from UV damage?
Natural oil conditioners provide limited UV protection. They nourish leather and improve flexibility, but they are not UV blockers. For serious UV defence in Dubai's sun, a dedicated UV-protective product should be applied on top of the natural conditioning routine.
How long does natural conditioning last compared to commercial conditioners?
In Dubai's heat, natural conditioners last roughly 4–6 weeks versus 2–3 months for most commercial products. You get a chemical-free approach with no synthetic additives, but you'll reapply more often. Dullness or slight stiffness are the signs it's time to recondition.